User Guide
Fast RAW photo culling: keep, reject, rate and label. CR2, NEF, ARW, DNG.
Step-by-Step Tutorial
1. What RawTriage is — and what it is not
RawTriage is a culling tool. It exists to answer one question, fast and repeatedly: keep or reject? You point it at a folder of RAW files, and it decodes them — CR2, CR3, NEF, ARW, DNG, ORF, RW2, PEF, SRW, RAF, plus JPEG — so you can make the first-pass decision on your phone instead of at your desk.
Then it makes sure the decision survives the trip back:
- Stars, keep/reject flags and colour labels are written into standard XMP sidecar files next to your RAWs (a Pro capability — see §16), so Lightroom, Capture One, Bridge and darktable pick them up automatically. Ratings you already applied on the desktop are read back into the app on any tier.
- Import copies a card to a destination with an optional checksum verification pass, so you know the bytes landed before you format.
- Export turns your keepers into JPEGs — full size or downscaled — into a folder or straight into another app.
It is not an editor. There are no exposure sliders, no masks, no presets, no healing brush. It will not make your photos look better; it decides which ones are worth opening later. If that sounds like a limitation, it is the whole point: culling 1,200 frames in an editor's Develop module is slow, and this is the alternative.
It is not a phone gallery cleaner. It will not find duplicates or blurry selfies. It works on folders you explicitly hand it, and it assumes every file in them is a photograph you chose to shoot.
What makes it different from other Android RAW apps
| RawTriage | Typical Android RAW app | |
|---|---|---|
| Purpose | Culling workflow | Editing or format conversion |
| Storage access | Only folders you pick (no storage permission) | Broad media access |
| Leaves the device | Nothing, except Google Play billing | Often accounts, cloud, analytics |
| Desktop round-trip | XMP sidecars, read and written | Usually none |
| Working state | Stars, flags, five Adobe colour labels | Often none |
2. Before you start
Requirements
- An Android phone or tablet running Android 8.0 (Oreo) or newer.
- Your photos on the device: internal storage, a microSD card, or a USB drive attached over OTG. RawTriage reads all three through the same system picker.
- The Google Play Store app present if you want the Pro subscription (see §16). The free tier needs no store, no account and no network.
- The app uses a fixed dark theme — it is built for looking at photographs, not for daylight UI aesthetics.
A word about how it opens your files
RawTriage declares no storage permission at all. Instead, Android's Storage Access Framework gives it a revocable grant over exactly the folders you choose, and the app remembers that grant across restarts and reboots.
Two practical consequences:
- The first time you add a folder, Android's own folder picker appears — not an app screen. You are granting access to that one folder (and everything under it), nothing else.
- You can take it back at any time — remove the folder inside the app, clear the app's data, or revoke the access in Android Settings where your device exposes it.
A word about what the app will show you
RawTriage lists RAW files. A folder with only JPEGs and no RAW files is treated as having nothing in it — it will not even appear in your folder list. JPEGs beside a RAW of the same base name are folded into that RAW rather than listed twice (§5).
3. Your first cull in five minutes
The short version, for people who would rather read the walkthrough afterwards.
- Tap + (bottom-right) and pick a folder containing RAW files.
- Tap the folder card to open it. Thumbnails appear as the embedded previews are extracted.
- Single-tap a thumbnail to open it full-screen. Swipe left/right between frames.
- Decide, using the bottom bar or the swipe gestures:
- Swipe up or tap the green heart → keep
- Swipe down or tap the red bin → reject
- Tap a star → rate it (rating a frame also marks it kept)
- Turn on auto-advance (the ⏭ icon in the gallery top bar) and each of those taps will move you to the next frame automatically. That is the single biggest speed setting in the app.
- When you are done, go back to the gallery. The red bin icon in the top bar carries a count of everything you rejected. Tap it, confirm, and read the undo snackbar before it disappears.
- To get the keepers off the phone, see §13 (export) or §15 (the XMP sidecars your desktop editor will read).
Everything below is the detail behind those seven steps.
4. Folders: giving the app something to read
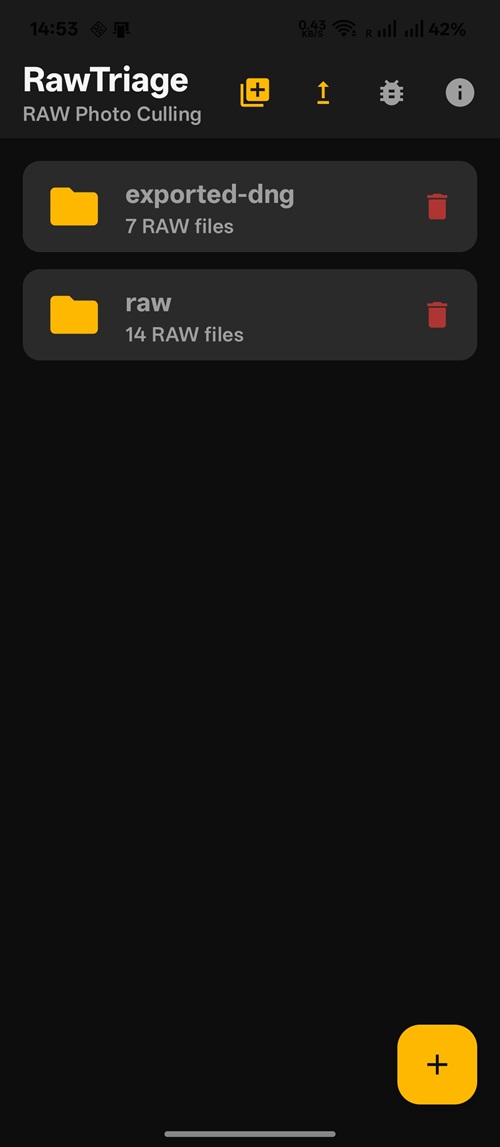
Adding a folder
Tap the + button (bottom-right). Android's folder picker opens. Choose the folder that holds your shoot — the card's DCIM, an exported directory, a synced Dropbox folder, whatever you have — and confirm.
- Subfolders are included. Picking
DCIMgives you every RAW inDCIM/100CANON,DCIM/101CANONand so on, flattened into one grid. - Picking the same folder twice does nothing (silently — there is no error, which is a little unnerving the first time).
- A folder that contains no RAW files is quietly dropped. If you add a folder of JPEGs and it never appears, that is why.
- The count on each card (
14 RAW files) counts RAW files only — JPEGs and XMP sidecars in the same folder are not included, even though the app uses them.
The top bar
| Icon | What it does |
|---|---|
| Import (photo with a +) | Copy a card or folder into a destination, optionally checksum-verified. Pro — see §12. |
| RawTriage Pro (upward arrow) | Open the Pro screen: start the free trial, restore a purchase, or manage/cancel a subscription. Accent-coloured when Pro is active. |
| Help (question mark) | Opens the online help page in your browser. If no app on the device can open a web link, a toast says so. |
| Diagnostics (bug) | Crash reports, the last decode error, recent activity, and a decoder trace — see §18. |
| Licences (i) | Privacy policy link and the full text of every open-source licence the app ships. |
Removing a folder
Tap the bin icon on the card, or long-press anywhere on the card. Both do the same thing, and neither asks for confirmation.
Removing a folder does not delete anything from your device. It forgets the folder. Your ratings and flags are kept, and re-adding the same folder brings them back — they are stored against the file, not the folder.
When a folder goes missing
If a card is unmounted, a USB drive is unplugged, or you revoke the grant in Android Settings, that folder silently disappears from the list. Re-attach the volume and it comes back — the app remembers the URI and never prunes it. Nothing is lost, and nothing is reported either, which is worth knowing before you spend ten minutes wondering where a folder went.
One quirk worth knowing
The folder list is refreshed when the app starts, when you add or remove a folder, and after a deletion settles. It is not refreshed after an import, so a card's 14 RAW files count can look stale until you restart or add/remove a folder.
5. The gallery: your contact sheet
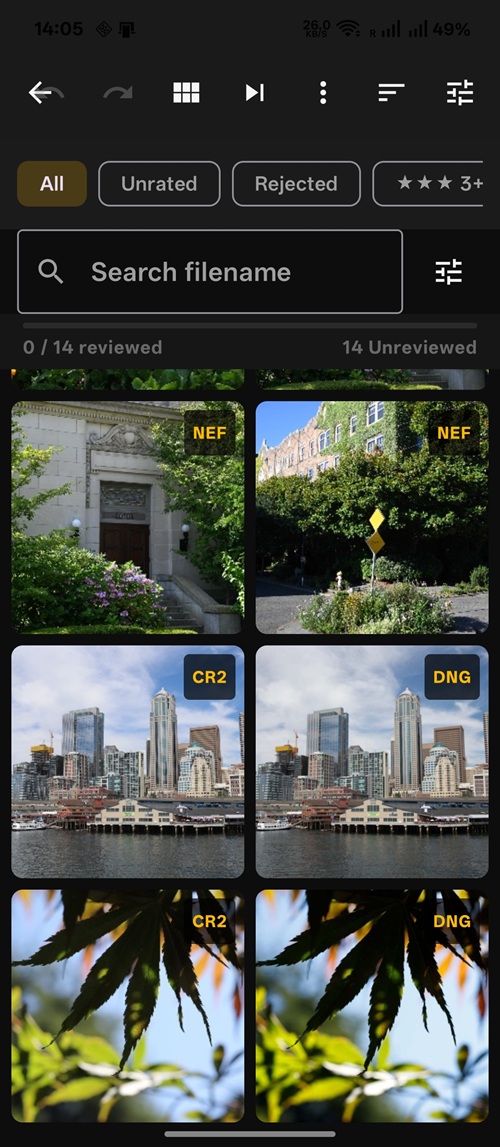
Tap a folder card to open it. The grid is adaptive — each cell wants about 140 dp — so you get two to three columns on a phone, more on a tablet or in landscape.
Reading a thumbnail
Each cell can carry up to five pieces of information:
| Mark | Where | Meaning |
|---|---|---|
Format badge — CR3, NEF, DNG | top-right | The file's actual extension |
| Stack badge — a layered-squares icon and a number | under the format badge | This cell represents that many files (a burst, or a RAW with a JPEG twin) |
| Star row | bottom-left | The rating, shown as five stars (filled and empty), so ★★★☆☆ is three stars |
| Green heart + green wash | bottom-right / over the cell | Kept |
| Red wash | over the whole cell | Rejected — note there is no icon for rejection, just the wash |
| Colour dot | top-left | An Adobe colour label: red, yellow, green, blue or purple |
Gestures in the grid
- Single tap → open the image full-screen.
- Double-tap → mark kept (clears a rejection).
- Long-press → mark rejected (clears a keep).
That is the whole two-pass rhythm: double-tap your way through the keepers with one thumb, long-press the duds with the other.
The top bar
The bar adapts to screen width. On a wide screen (tablet, landscape, unfolded) you get every action inline; on a phone, the less-used ones move into the ⋮ overflow menu.
| Control | Where | What it does |
|---|---|---|
| Undo | inline (wide) / overflow (phone) | Undo the last culling action — including a whole bulk operation |
| Redo | inline / overflow | Redo it |
| Select images (⊞) | inline / inline | Enter selection mode for bulk actions and Compare |
| Auto-advance (⏭) | inline / overflow | Advance automatically after each flag or rating in the viewer (§6) |
| ⋮ More options | inline / inline | Expand/collapse burst stacks, Reset entire pass…, Help |
| Sort | inline / overflow | Name A→Z, Name Z→A, Date Old→New, Date New→Old |
| Capture filters (sliders) | inline / second row | Filter by camera, lens, ISO and orientation (§14) |
| Delete rejected files (red bin, badged) | inline / inline, whenever anything is rejected | The only way to actually delete (§11) |
Undo is generous. Every keep, reject, star, label and bulk action is recorded, and one Undo reverses the whole action — a 200-frame "Keep selected" comes back in one tap. The history is cleared when you leave the folder, so it is a working aid rather than a long-term safety net; the real safety net is §11.
Reset entire pass… clears every flag, star and colour label in the folder. It asks for confirmation, and it is itself undoable — once. It never touches your files.
Filter chips
The chip row under the title filters the grid. In the order they appear:
All · Unrated · Rejected · ★★★ 3+ · ★★★★ 4+ · ★★★★★ 5 · ★ 1+ · ★★ 2+
- Unrated means genuinely untouched: no stars, no keep, no reject, no colour label. It is the chip you live on during a first pass.
- The star chips are minimum thresholds (
★ 1+means one star or more), except★★★★★ 5, which is exactly five. - The order is a little eccentric — the ascending thresholds after
5are★ 1+and★★ 2+— so read the labels rather than trusting the sequence.
Search and sorting
The second row has a Search filename field — filename only, case-insensitive — and a sliders button that opens the capture facets. A Clear button appears while a search is active and clears both the search and any capture facets.
Sorting is on Name (case-insensitive) or Date, ascending or descending. Dates come from the EXIF capture time where available, falling back to the file's modification time. Frames with no resolvable date sort to the bottom in both directions rather than being scattered through the results.
The name subtitle under the folder title tells you which you are looking at: 14 images, or 6 of 14 images when a filter, a search or collapsed stacks are hiding something.
Burst stacks and RAW+JPEG pairs
RawTriage groups two kinds of redundancy so your first pass is not spent rejecting the same moment four times:
- RAW + JPEG twins. If
IMG_1234.CR3andIMG_1234.JPGsit in the same folder, the JPEG is folded into the RAW. One cell, one decision. Removing the RAW leaves the JPEG as a normal, cullable file. - Bursts. Consecutive frames whose names differ only by a trailing number that advanced by one or two, captured within ten seconds of each other, collapse into one stack. The representative frame carries a badge with the total file count.
Stack collapsing is on by default. Use ⋮ → Expand burst stacks to see every frame individually when you need to pick the frame from a burst. That setting is remembered across launches.
Note that collapsed frames keep their own flags — expand a stack you have already culled and you will see which frames you rejected inside it. Also note that the viewer always swipes through every file in the folder, not just the ones currently visible in the grid (§7).
6. Culling: keep, reject, stars and labels
The rules
The three decisions are not independent, and knowing the rules saves a lot of confusion:
| Action | Result |
|---|---|
| Keep | kept, rejection cleared. Rating and colour label unchanged. |
| Reject | rejected, keep cleared. The rating is left alone — a 3-star frame you reject keeps its three stars, which is why the Rejected chip is the way to review them before deleting. |
| Set 1–5 stars | Rating set, and the frame is marked kept and any rejection cleared. |
| Tap the star that is already set | Rating cleared to 0. The keep flag stays. |
| Set a colour label | Label set. Nothing else changes. |
| Tap the active colour label again | Label cleared. |
So stars imply "kept", but "kept" does not imply stars — which is exactly what you want for a two-pass workflow.
Auto-advance
The ⏭ toggle in the gallery top bar controls what happens in the viewer. With it on, tapping Keep, Reject or a star also advances to the next frame. With it off, you stay put and swipe when you are ready.
Auto-advance is remembered between launches and is off by default. Turn it on for a first pass and off for careful second-pass grading.
Two details worth knowing:
- The swipe-up / swipe-down gestures in the viewer do not auto-advance, even when the setting is on. Only the buttons and stars do.
- It does nothing on the last frame of the folder.
Colour labels
Five Adobe-compatible labels — red, yellow, green, blue, purple — are available on the viewer's bottom bar and on the bulk toolbar. They are written to XMP as xmp:Label using exactly the strings Lightroom and Bridge use, so they round-trip. Use them for whatever your own workflow needs: client picks, retouch queue, print candidates, second-shooter frames.
Bulk culling
Tap ⊞ Select images to enter selection mode, then tap thumbnails to select as many as you like. The bottom bar has two rows:
Row 1 — Keep selected, Reject selected, Clear flags on selected, 1–5 star buttons, and the five colour labels.
Row 2 — the selection count ("32 selected" or "Tap images to select"), a Select all / Clear button, Share selected, Export selected to folder, Done, and Compare (N) when 2–4 frames are selected.
Everything here is one undoable action: bulk-flag 300 frames, realise you meant a different 300, and one Undo reverses it.
A star rating on a selection also marks every frame in it kept — the same rule as single images. Clear flags on selected is the only control that will un-keep a frame without rejecting it.
A recommended two-pass workflow
- Pass one — triage. Gallery, keep/expand stacks collapsed, auto-advance on. Open the first frame and use double-tap / long-press in the grid, or swipe up / swipe down in the viewer. Do not rate anything. The goal is to cut 1,200 frames to 300 without thinking about quality.
- Filter to
Unrated— or just look at the progress strip: when it reads1200 / 1200 reviewed, pass one is done. - Pass two — grade. Filter to the keepable set, then open frames and rate them 1–5. Rating a frame keeps it automatically, so this pass never leaves the state inconsistent.
- Pass three — deliver. Use the star chips and the capture facets to narrow to
★★★★ 4+, compare the near-identical candidates side by side (§10), and export or hand off. - Reset with ⋮ → Reset entire pass… when you want to start over on the same folder. Your files are untouched.
7. The viewer: judging a single frame
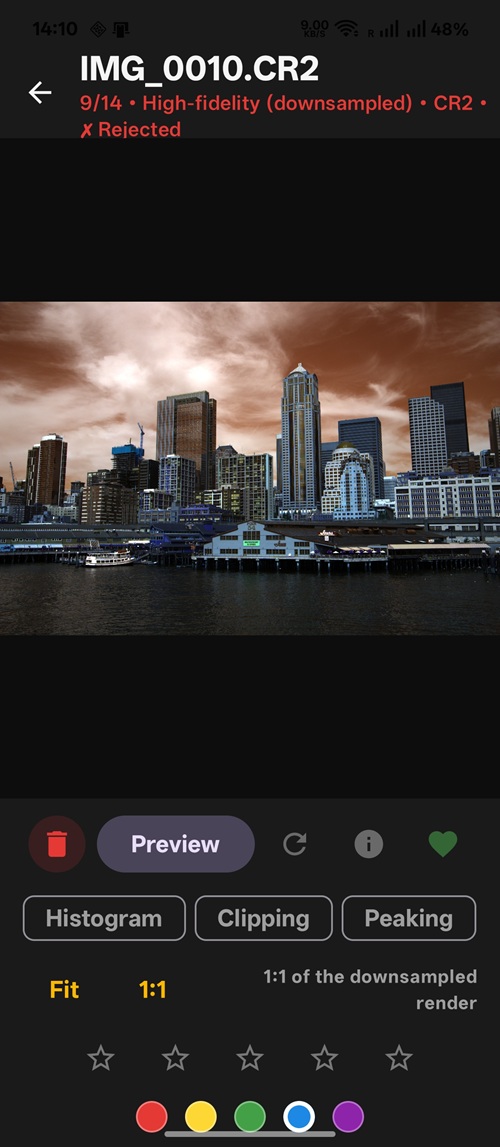
Moving around
Tap any thumbnail — filtered or not — and the viewer opens. Swipe left and right to move through frames.
One thing to internalise: the viewer pages through the entire folder, not the filtered grid. If you filtered to ★★★★ 4+ and tap the first result, the next swipe takes you to whatever file happens to follow it in the folder. The counter (9/412) tells you where you are in the whole set.
Filter and stack settings in the gallery do not restrict the viewer. If you want a restricted sequence, use Compare (§10) instead.
What the top bar is telling you
The first line is the filename. The second is assembled from four parts, separated by bullets:
9/412 • High-fidelity (downsampled) • CR2 • ♥ Kept
 │        │                            │     │
 │        │                            │     └ flag, when there is one
 │        │                            └ file format
 │        └ which decode you are looking at
 └ position in the folder
The line is tinted green when kept and red when rejected, so you can read the state at a glance while swiping.
Gestures
| Gesture | What it does |
|---|---|
| Swipe left / right | Previous / next frame — but only while the image is at fit size |
| Pinch | Zoom, from fit up to at least 8× fit |
| Drag with one finger | Pan, once zoomed. You cannot pan into the empty letterbox bars. |
| Double-tap | Toggle between fit and 1:1, anchored on the point you tapped — the pixel under your finger stays under your finger |
| Swipe up (≥ 72 dp) | Mark kept |
| Swipe down (≥ 72 dp) | Mark rejected |
The vertical swipes are the reason this app is comfortable one-handed: you can cull without moving your thumb to a button. They are evaluated when your finger lifts, so a short drag does nothing, and they are disabled while you are zoomed in — there, vertical drags pan the image, as they should.
The bottom bar
| Control | Icon | What it does |
|---|---|---|
| Reject | red bin | Marks the frame rejected |
| High-Fidelity / Preview | quality icon | Toggles the decode quality — see below |
| Re-extract image | refresh arrow | Discards this frame's cached decode and rebuilds it from the original file |
| Show EXIF | ⓘ | Toggles the EXIF panel |
| Keep | green heart | Marks the frame kept |
| ★★★★★ | stars | Sets a rating; tapping the active star clears it |
| Colour dots | five circles | Sets or clears an Adobe colour label |
Preview vs High-Fidelity
This is the most important distinction in the app, and the least obvious.
Preview (what you see on arrival) is the JPEG the camera embedded inside the RAW file. It is full-frame, arrives almost instantly, and is exactly what the camera thought the picture should look like. It is usually 1,000–2,000 pixels on the long edge.
High-Fidelity runs the real RAW pipeline through LibRaw: demosaicing, and the camera's own white balance applied, so what you see is derived from the sensor data rather than from the camera's rendering. It takes a moment — a Decoding full RAW… spinner covers the frame — and the result is cached, so returning to a frame you already decoded is instant.
Use Preview for composition, expression, framing and culling decisions. Use High-Fidelity for exposure, colour and the inspection tools that need real pixels.
The honest caveat about High-Fidelity
The High-Fidelity render is capped. The decode always uses 2×2 binning and then caps the result at 8 million pixels, so on a modern sensor the render holds fewer pixels than the file:
- a 24 MP frame renders at roughly 6 MP;
- a 60 MP frame renders at roughly 3.8 MP.
The UI says so in three places rather than implying otherwise:
- the top bar reads
High-fidelity (downsampled); - the zoom row underneath the chips reads
1:1 of the downsampled render; - the EXIF panel's Decoder group gains a Decoded render row, e.g.
2376 × 1584 — downsampled from 9504 × 6336.
In practice: High-Fidelity is excellent for judging exposure, colour and where focus roughly falls. It is not sufficient to confirm critical focus at the pixel level on a high-resolution body. If you need that, that is what your desktop is for — RawTriage's job is to make sure only the frames that deserve that treatment get there.
Fit and 1:1
Fit frames the whole image. 1:1 maps one render pixel to one screen pixel.
- 1:1 is disabled until the High-Fidelity render is on screen, and while disabled the row explains why:
High-Fidelity enables 1:1. Offering "1:1" on a 1,024 px preview would be presenting an upscaled thumbnail as if it were sensor data. - Double-tap is not gated the same way — it always toggles between fit and 1:1 of whatever bitmap is displayed. On a preview, that means one preview pixel per screen pixel.
- Zoom is a multiplier on the fit size, not a number of pixels, so the same gesture frames the same subject on a 45 MP frame and on the preview standing in for it.
When a frame will not render
If the preview or the full decode fails you get a message and a pill over the image reading … — tap Regenerate. Despite the name, the button it refers to is the refresh arrow in the bottom bar, described as Re-extract image. Tapping it purges everything cached for that one frame — the staged RAW copy, the memory entries and the disk thumbnail — and rebuilds both renders from the original file.
Reach for it when:
- a preview renders banded, torn or with block artefacts at high zoom;
- the full decode reports a failure;
- a frame you have decoded before still looks wrong after a re-launch.
It is safe: it only ever deletes cached copies. Your original file is never touched.
A note on speed
The viewer pre-loads neighbours — two ahead when you swipe forward, two back when you swipe backward — so swiping is usually instant, and prefetching is preview-only to keep it smooth. If you swipe faster than your phone can keep up, you will see a spinner rather than a black screen; slow down for a moment and it catches up.
One side effect of that design: EXIF is fetched separately from the preview, so on a fresh frame the panel may briefly read Loading EXIF… before filling itself in. You do not need to close and reopen it.
8. Inspection tools: histogram, clipping, peaking, grid, level
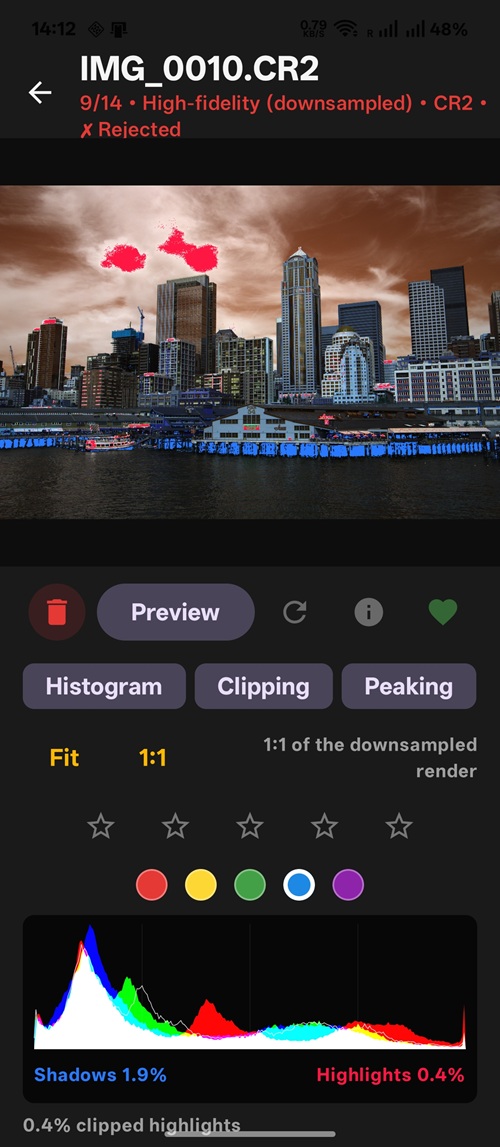
A scrollable row of chips sits between the image and the zoom controls: Histogram, Clipping, Peaking, Grid, Level. They are independent toggles and several can be on at once — with one deliberate exception noted below.
Histogram
The histogram is computed from the pixels actually on screen (a 512 px aspect-preserving sample) in 256 bins. It draws the red, green and blue channels additively, so overlapping channels read as yellow and grey, with a white luma trace on top and quarter-stop gridlines at ¼, ½ and ¾.
Below the plot are two readouts:
- Shadows in blue and Highlights in red, each showing the percentage of pixels clipped at that end (
Shadows 1.9%,Highlights 0.4%). Below a tenth of a percent they read—rather than a misleading0.0%. - A caption beneath the panel giving the clipped highlight percentage for the luma channel, e.g.
0.4% clipped highlights.
Clipping
Paints the image directly: every pixel with any channel at or above 250 goes solid red, and every pixel with luma at or below 4 goes solid blue. Everything else stays untouched, so you see exactly where the clipping is rather than just that it exists.
Peaking
Focus peaking marks locally contrasty pixels in red — edges in other words — so you can see where the plane of focus actually falls across a frame. It is the fastest way to answer "did the lens grab the eye or the ear?".
Peaking is disabled until a High-Fidelity decode has landed, and it carries no Pro badge while disabled. Measuring per-pixel sharpness on a downscaled preview would say nothing about where the lens focused, so the chip simply refuses until there are real pixels to measure.
Grid and Level
- Grid draws rule-of-thirds lines over the image — so it moves and scales with the photograph, which is what you want when you are judging a composition against the thirds.
- Level draws a centred, screen-fixed crosshair and circle while you are zoomed in. It is a framing aid (it marks the image centre and the frame's horizontal), not a horizon sensor: it does not use the phone's gyroscope.
Pixel grid
There is one more overlay that has no chip: zoom past 8× with the High-Fidelity render on screen and a faint 1-source-pixel grid appears, so you can see individual pixels rather than guessing at the render's resolution. It never appears on a preview, because pixel boundaries on a downscaled image are a fiction.
One exception to "independent toggles"
Clipping and peaking are independent switches but share one overlay slot. If both are on, the clipping overlay is what you see. Turn one off to see the other. The two are not blended, because a picture painted with both a "blown" reading and a "sharp" reading would be two contradictory statements in one image.
A note on how overlays stay aligned
The clipping and peaking overlays are computed on a smaller copy of the image for speed, then drawn with the same fit-and-transform as the photograph itself. They register exactly because they are drawn through the same transform, not because anything is nudged into place afterwards.
9. The EXIF panel
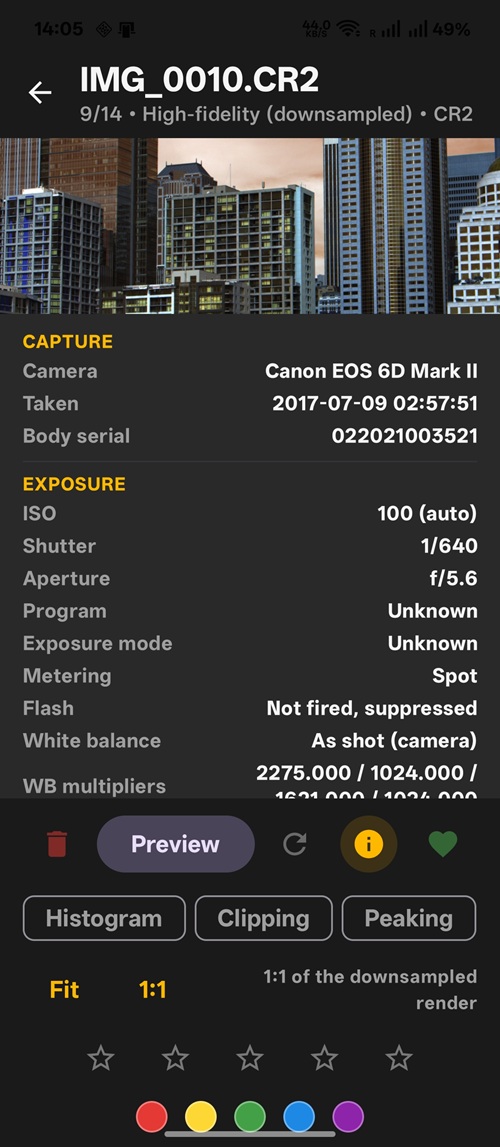
Tap the ⓘ button in the viewer's bottom bar. A scrollable panel slides up from the bottom, grouped into six sections:
| Group | Fields you may see |
|---|---|
| Capture | Camera, Taken, Software, Body serial |
| Exposure | ISO (800 (auto) when the camera chose it), Shutter, Aperture, Max aperture, Exposure comp, Program, Exposure mode, Metering, Flash, White balance, WB multipliers |
| Lens | Lens, Focal length, Full-frame equiv, Lens serial, Stabilisation, Focus mode, Drive mode |
| Image | Resolution (6000 × 4000 (24.0 MP)), Colour space, Sensor temp, Ambient temp, Temp rise |
| Location | Coordinates, Latitude, Longitude, Altitude — only when the file has a GPS fix |
| Decoder | Decoded render, White balance, Gamma, Brightness, Orientation — only while the High-Fidelity render is on screen |
A field your camera did not record is omitted entirely rather than printed as "Unknown". An absent row is information; a row reading "Unknown" is noise that also hides whether the value was genuinely unavailable. A whole group disappears if it has nothing to say.
Coordinates are a link. Tap the coordinate row and the phone's map app opens on that point. If no app can handle it, nothing happens — the numbers stay readable, which is the fallback that matters.
The Decoder group is the honest one. It tells you what the app actually did to produce the pixels in front of you: the render size and what it was downsampled from, the white balance the decoder applied (the camera's own), gamma, brightness, and the orientation LibRaw resolved. It appears only when you are looking at the High-Fidelity render, because it describes that render and nothing else.
10. Compare mode
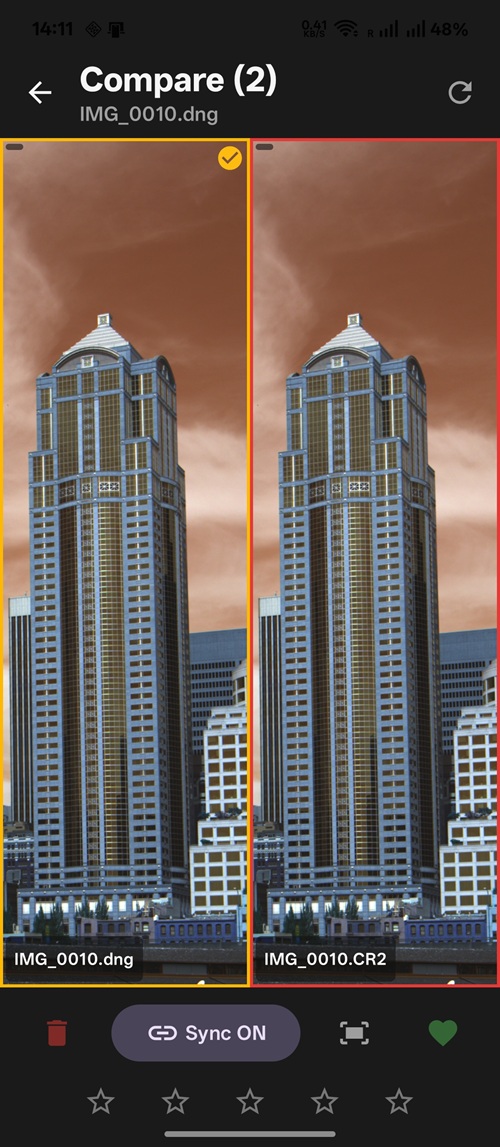
For the moment when you have four nearly identical frames of the same expression and need to pick one. Pro feature.
Entering and choosing
- Tap ⊞ Select images in the gallery top bar.
- Tap two, three or four thumbnails. The Compare (N) button appears only in that range; a larger selection is for bulk culling instead.
- Tap Compare.
You can compare a RAW with its own JPEG twin, or a RAW against a JPEG that has no RAW sibling — the selection resolves through the full file list, so twins hidden inside a collapsed stack are reachable.
Layout
- 2 frames — side by side, equal halves.
- 3 frames — two on top, the third full width beneath.
- 4 frames — a 2 × 2 grid.
The active pane
One pane is active at a time: it carries an amber border and a tick badge at the top-right. Tap a pane to make it active — panning and pinching do not change it, only a tap does.
The bottom bar's Reject, Keep and star controls act on the active pane. A non-active pane's border instead shows its state: green if kept, red if rejected.
Each pane shows the filename bottom-left and its heart-and-stars top-left, so you always know which frame you are judging.
Synchronised zoom
The Sync ON / Sync OFF button in the middle of the bottom bar controls whether the panes share a viewport. It defaults to ON, and switches back to ON whenever you load a new set of images.
What is shared is worth understanding, because it is what makes this work with mixed frames:
- The shared value is the centre of the visible region in normalised image space — (0,0) is the top-left of that frame's own pixel grid, (1,1) the bottom-right — plus the zoom factor relative to fit.
- It is therefore the same subject point as a fraction of the frame, not the same screen coordinates. Pan a 3:2 landscape and a 2:3 portrait and both land on the same part of the picture, in whatever orientation the camera recorded. Each bitmap is already upright because rotation is applied at decode time.
- Panes of different shapes will show different amounts of surrounding subject, which is unavoidable and usually useful.
With Sync OFF, each pane zooms and pans independently, which is the right mode when you are inspecting two different regions of two different frames.
Fit to screen (the frame icon) returns every pane to a fitted view — whichever sync mode is active — and it resets both the shared viewport and the per-pane ones, so a stale zoom cannot reappear when you toggle sync back on.
One behaviour to expect: toggling sync off while you are zoomed in drops the panes back to their own last local view — usually fit — and toggling it back on restores the shared zoomed framing.
What happens when you zoom
Crossing from fit into a zoom triggers a full RAW decode for every pane at once, not just the active one. A spinner appears on each pane that has not been decoded yet, and the soft preview stays visible underneath while it works.
Because a full decode holds a lot of memory at once, decodes run one at a time across the whole app. So the panes go high-fidelity one after another — the first sharpens, then the second, and so on — rather than all at once. A pane that has already been decoded (in the viewer, say) is served from cache with no wait. This is deliberate: decoding four 45 MP frames simultaneously is how you get a crash, or a page of block artefacts, in the middle of a pinch.
Re-extract images
The refresh icon in the Compare top bar does for every compared frame what the viewer's refresh does for one: throws away the cached copies and re-decodes from the original file. It is the repair tool when a pane's render looks wrong.
Two things Compare does not have
- No export or share button. Leave Compare, re-select your frames in the gallery, and export from there. Leaving Compare clears the selection, so plan for that.
- No visible Undo snackbar on the Compare screen. Your Keep/Reject/star actions are still recorded in the undo history, so after returning to the gallery the Undo button will reverse them — you just will not be prompted on the Compare screen itself. Reject and Keep are also one-way here: tapping the flag that is already set does nothing. Use the gallery's Clear flags on selected to un-flag a frame.
11. Deleting: how the safety net works
This is the feature most worth understanding properly, because it is the only one that can lose your work.
Rejecting is not deleting
Marking a frame rejected changes a flag. The file stays exactly where it is. You can review the rejected set at any time with the Rejected filter chip, and change your mind about any of them.
Nothing is deleted until you tap the red bin in the gallery top bar — the one with the count badge on it.
The confirmation dialog
Tapping it opens a dialog:
Delete Files?
This will delete 24 RAW files from your device. You will have a few seconds to undo; once that window closes the files are gone for good.
☐ Also delete the XMP sidecar (ratings and keywords)
[ Cancel ] [ Delete 24 files ]
The checkbox is unchecked every time, and it is worth leaving that way unless you are sure. An XMP sidecar often holds ratings, keywords and develop settings written by Lightroom or Capture One. Losing the sidecar can be a bigger loss than losing the RAW; unchecked, the RAW goes and the sidecar stays.
What happens after you confirm
The rejected frames vanish from the grid immediately and a long snackbar appears:
Deleting 24 files… [ Undo ]
Nothing has been deleted yet. You have a window to change your mind, and tapping Undo puts the frames back — re-sorted into their proper place, with nothing ever removed from disk.
The delete is then committed when any of these happens:
- the snackbar times out (about ten seconds);
- you dismiss the snackbar by any means other than tapping Undo;
- you leave the gallery screen — going back to the folder list commits it straight away;
- the app's own backstop timer fires, at twelve seconds.
Point 3 is the one that catches people out: the window is not guaranteed to last the full twelve seconds. Going back to the folder list ends it immediately, and even opening an image and staying there only buys you until the snackbar lapses. If you are having second thoughts, tap Undo — do not navigate.
Only one deletion can be pending at a time; tapping the bin again while a window is open does nothing.
If a delete goes wrong
- Partial failure — some files were already moved by another app, or the provider refused — is reported honestly:
Deleted 18 of 24 files. The rest stay on the device. - Undo is confirmed with
Deletion undone. - If the app is killed outright mid-window, the files stay on disk — nothing is lost — but the deletion does not happen either. Those frames will still be marked rejected the next time you open the folder, so you can simply delete them again.
Why there is no system recycle bin
Android's own trash (MediaStore.createTrashRequest) works on media-library IDs. RawTriage is built on Storage Access Framework folder grants with no storage permission and no MediaStore access, so using the system bin would mean maintaining a second, entirely separate file model just for deletion. Deferring the delete gives the same protection — plus it works on SD cards, USB drives and cloud providers that the media library never indexes.
12. Importing from a card
Pro feature. Import copies a whole card or folder into a destination you choose, with optional verification that every byte arrived. It is the "can I format this card now?" feature.
The flow
- On the folder screen, tap the Import icon (photo with a +). It is disabled while an import is running.
- Pick the source — the card, in the system folder picker. RawTriage takes a read-only grant on it.
- Pick the destination — the picker opens again immediately. The destination gets a write grant.
- A confirmation dialog appears:
Import RAW files?
Every RAW file, JPEG and XMP sidecar in the source folder is copied into the destination, keeping its subfolders. Existing files are never overwritten.
☑ Verify each file by checksum
[ Cancel ] [ Import ]
The verification checkbox is on by default. Leave it on when you are about to format the card; turn it off only when you want the copy to finish faster and do not need proof.
- Tap Import. A non-dismissible progress dialog shows which file is in flight and how far through it the copy is, in bytes. You cannot cancel it, and you cannot navigate away until it finishes.
What gets copied
Every file whose extension is cr2, cr3, nef, arw, dng, orf, rw2, pef, srw, raf, jpg, jpeg or xmp — the same set the gallery scans, so a file the importer copies can never be one the grid would hide, and vice versa. Subfolders are preserved.
Two directories are skipped: misc and .thumbnails. Those are a camera's recycle bin and metadata cache; there is nothing in them a photographer culls from.
What it never does
- It never modifies the source. The source grant is read-only, so whatever goes wrong later, your card is untouched.
- It never overwrites. A name already in use gets the desktop-style suffix:
IMG_1234.ARWbecomesIMG_1234 (2).ARW. Re-importing a card you have partly imported before is normal, and the destination may hold a copy you have since edited or culled. - It never lets the source and destination overlap. A destination that is the source, sits inside it, or contains it is refused before any bytes move, with its own dialog:
Choose a different destination
Destination is inside the source folder
What verification actually proves
With the checkbox on, RawTriage computes a SHA-256 digest of the source bytes while the copy streams — so the card is still read only once — and then re-reads the destination and compares digests.
Why digests rather than a size check: the failures worth catching (a marginal card reader, a power glitch, a directory entry written before its data) all produce a file of exactly the right size with the wrong contents. A length comparison passes while the RAW decodes to noise. Length is kept only as a cheap pre-filter that skips the expensive read-back for copies already known bad.
A copy that fails verification is deleted from the destination, not left behind. A wrong file with the right name would look like a successful import, and the card would be formatted believing the frame was safe.
Reading the result
The summary distinguishes two things that call for different advice:
| Message | Meaning |
|---|---|
Imported 412 file(s), verified | Every file copied and the read-back agreed. The card is safe to format. |
Imported 412 file(s); 3 could not be verified | They copied but could not be proven. Consider re-running the import for those. |
Imported 409 of 412; 3 failed, 0 unverified. First error: Checksum mismatch after copy | 3 files are not on the destination. Do not format yet. |
Nothing to import | The source was read and holds nothing the importer copies. This is the only thing that message means. |
A failed import means the file is not safely on the destination. An unverified import means it copied but could not be proven. A photographer deciding whether to format a card needs to know which happened, so the app never folds one into the other.
When an import cannot start at all
The three results above all describe a run that happened. There is a fourth case, and it is the one to act on:
| Message | Meaning |
|---|---|
Import failed: Cannot write to the destination folder | The destination refused a write. Nothing was copied. |
Import failed: Source folder is unavailable | The card or drive could not be opened — usually unmounted, or the access grant was revoked. |
Import failed: Destination folder is unavailable | The destination could not be opened. |
Import failed: Destination is inside the source folder | The two folders overlap. Pick a different destination. |
These are reported as failures, never as Nothing to import. That distinction is the whole point: "nothing to import" means the card holds nothing worth copying and is therefore safe to format, while "import failed" means your backup did not happen and the card is not safe to touch yet. The identical wording for both was a defect, not a design choice.
If a folder becomes unreadable mid-run, or a copy throws for a reason the per-file loop did not catch, the app reports the run as failed rather than inventing a file count for it. A blocked import is also written into the Diagnostics activity ring, so a support report can say why it never started.
A note on where the result appears
The summary is a snackbar on the folder screen, which is where you are standing when the import finishes. If you dismiss it before reading it, or you miss it, verify the import rather than trusting a message you did not see: open the destination folder in RawTriage and check the file count, or check it in a file manager.
After the import
- The destination is not added to your folder list automatically. Tap + and add it if you want to browse it in the app.
- The folder list is not re-scanned after an import, so an existing card's file count can look stale until you restart or add/remove a folder.
A safe card-offload recipe
- Insert the card. Import → source: the card → destination: your working drive.
- Leave Verify each file by checksum checked.
- When it finishes, open the destination folder in the app and confirm the frame count matches what the camera said you shot.
- Spot-check a few frames by opening them and tapping High-Fidelity — a corrupt RAW will typically fail to decode or render as noise.
- Only then format the card.
13. Exporting and sharing
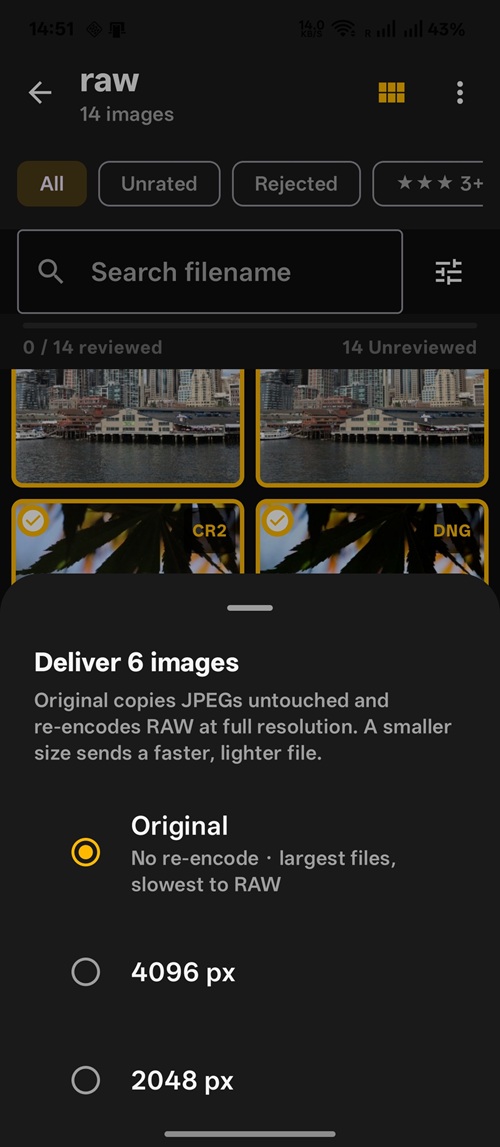
Pro feature. Export turns selected frames into JPEGs — into a folder of your choosing, or into another app.
The flow
- Tap ⊞ Select images in the gallery and select the frames you want.
- Tap Export selected to folder (download icon) or Share selected (share icon).
- A sheet appears:
Deliver 6 images
Original copies JPEGs untouched and re-encodes RAW at full resolution. A smaller size sends a faster, lighter file.
◉ Original — No re-encode · largest files, slowest to RAW
○ 4096 px
○ 2048 px
○ 1080 px
- Pick a size. The sheet closes and the work starts immediately — there is no second confirmation.
- Export to folder opens the system folder picker (first time in a session), then writes into it. The chosen folder is remembered for the rest of the session, so subsequent exports skip the picker.
- Share writes the files into the app's private cache and opens Android's share sheet. Nothing leaves your device until you pick a recipient.
- A non-dismissible Exporting dialog shows progress file by file. There is no cancel.
Choosing a size
| Option | What it means |
|---|---|
| Original | No downscaling. A JPEG source is copied byte for byte, untouched, keeping its own EXIF and orientation. A RAW is decoded and re-encoded at full resolution. The slowest option for RAWs. |
| 4096 px | Longest edge 4096 px |
| 2048 px | Longest edge 2048 px — the default |
| 1080 px | Longest edge 1080 px |
Images already smaller than the target are left alone; nothing is ever upscaled.
What is written
- Format: JPEG at quality 92, except the Original-JPEG case, which is a straight copy.
- Naming: the source stem with a
.jpgextension —IMG_1234.CR3becomesIMG_1234.jpg. The original RAW extension never survives. - Metadata: the star rating is written into the standard EXIF
Ratingtag, so a Lightroom or Photos import can read it. A capture date is filled in only where the file has none; a camera's own timestamp is never overwritten. The rejected flag is deliberately not written — a delivered file carries no internal decision. - Orientation: no tag is invented. RAW-derived pixels are already upright, and a copied JPEG keeps its own tag.
Reading the result
| Message | Meaning |
|---|---|
Exported 6 image(s) as JPEG | All good |
Exported 6 image(s); 2 at preview quality | Two frames could not be decoded and their embedded preview was exported instead. A ≤ 1,024 px stand-in for a 45 MP frame is a genuinely different deliverable — re-export those frames after running Re-extract image on them. |
Exported 4 of 6; first failure: IMG_0042.jpg already exists | Partial success. The first error is quoted so you can decide whether to retry, change destination, or give up. |
Export failed: … | Nothing succeeded, with the reason |
Cannot write to that folder | Checked before any decode, so nothing was written |
Exports never overwrite. If IMG_1234.jpg already exists in the destination, that file is reported as a failure rather than silently replaced. Note that this differs from import, which suffixes collisions with (2). If you exported to the same folder twice, expect a list of already exists failures — pick a different folder or clear the old files.
A RAW and its JPEG twin
Each selected entry exports itself. There is no RAW→JPEG substitution, and because names are derived from the stem, selecting both IMG_1234.CR3 and IMG_1234.JPG produces the same output name — so export one, not both.
14. Finding a subset: filters, search and capture facets
Three tools narrow the grid, and they stack.
Rating and flag chips
All · Unrated · Rejected · ★★★ 3+ · ★★★★ 4+ · ★★★★★ 5 · ★ 1+ · ★★ 2+
Use Unrated for a first pass and Rejected to review what you are about to delete. Star chips are minimum thresholds (★★★★ 4+ means four or more), except ★★★★★ 5, which is exactly five.
Filename search
The Search filename field matches on filename only, case-insensitively. Search what the camera called the file, not what is in it — there is no keyword or content search in this version.
Capture facets
Tap the sliders button to open Capture filters. The sheet groups what the app could read from the folder's frames:
- CAMERA — one chip per distinct camera, e.g.
Canon EOS R6 - LENS — one chip per distinct lens model
- ORIENTATION —
Any orientation,Landscape,Portrait - ISO —
≤ 400,401–1600,1601–6400,> 6400
Camera and lens chips are multi-select; orientation and ISO are single-choice (tap the active ISO band again to clear it). Facets apply as you tap them — there is no Apply button, and the sheet stays open so you can stack several.
Two behaviours to expect:
- A frame whose metadata has not been read yet is hidden while a facet is armed. That is the honest answer, and it corrects itself within a moment, because arming a facet is what triggers the metadata read. Reading capture metadata… is displayed while that happens.
- Clearing filters is always allowed, even on the free tier — so you can never be stranded in a filtered view by a paywall. Narrowing by capture facet is a Pro capability.
The buttons carrying an active facet get an accent tint and a ! badge, and the header switches to 6 of 412 images so an over-constrained filter reads as a setting rather than as an empty folder.
15. XMP sidecars: getting your decisions into Lightroom
This is the feature that makes phone culling worth doing.
What gets written, and where
Every time you set a keep/reject flag, a star rating or a colour label, RawTriage writes a sidecar file beside the RAW:
_DSC1234.ARW → _DSC1234.xmpSidecars are standard XMP. Lightroom, Bridge, Capture One and darktable all read them, so your stars, flags and colour labels appear on the desktop with no import step. The labels use Adobe's own xmp:Label strings (Red, Yellow, Green, Blue, Purple), so they map onto the desktop's label colours.
Writing a sidecar is a Pro capability. On the free tier your culling still persists inside the app and survives restarts — you simply do not get the sidecar that makes it legible to a desktop editor. There is no error and no badge when this happens; it is deliberately silent, which is worth knowing if you are on the free tier and wondering where the .xmp files are.
Sidecars are merged, never replaced
If a sidecar already exists — because Lightroom wrote a crop, a develop history, lens corrections, keywords — RawTriage reads it first and merges. Only the fields it owns (rating, pick flag, label, keywords, orientation) are overwritten. Foreign attributes and the namespace declarations they depend on are preserved verbatim, and the packet is wrapped the way Adobe tools require.
Practically: rating a frame on your phone will not wipe the develop settings your desktop wrote. This is the behaviour you want and the one you should verify if you round-trip heavily.
Ratings you already applied on the desktop come back
When the app scans a folder and finds a sidecar for a frame it has no local record of, it reads the state out of the sidecar and adopts it: stars, keep/reject and colour label. A reject written by another editor is recognised from either xmpDM:pick = -1 or xmp:Rating = -1.
So the round trip works in both directions:
Desktop → phone: cull in Lightroom, save metadata, copy the folder to the phone, open it in RawTriage — your stars are already there.
Phone → desktop: cull on the phone, copy the folder (or the card) to the computer, and Lightroom/Capture One reads the sidecars on import.
What is not written
- No develop settings. The app does not edit, so it has nothing to say about exposure or crop.
- No keywords UI. The XMP model carries
dc:subjectand preserves keywords another tool wrote, but this version has no interface for adding them on the phone. - No rejected-flag field in exports. XMP carries the reject; an exported JPEG does not.
16. Free tier and Pro
RawTriage is free to use indefinitely for culling. Seven capabilities are Pro, and they are all "deep inspection" or "get it off the phone" features — the entire cull loop stays free, forever.
| Capability | Free | Pro |
|---|---|---|
| Folders, scanning, persistence | ✅ | ✅ |
| Gallery, sort, rating filter, filename search | ✅ | ✅ |
| Keep / Reject / Stars / Colour labels / bulk actions | ✅ | ✅ |
| Undo/redo, reset pass, burst stacking | ✅ | ✅ |
| Delete with undo window | ✅ | ✅ |
| EXIF panel, culling analytics | ✅ | ✅ |
| Viewer at preview quality, pinch-zoom, Fit | ✅ | ✅ |
| Full-resolution decode and 1:1 inspection (High-Fidelity) | — | ✅ |
| Side-by-side compare | — | ✅ |
| Export and share as JPEG | — | ✅ |
| Verified import from card or folder | — | ✅ |
| XMP sidecars for Lightroom and Capture One | — | ✅ |
| Filter by camera, lens, ISO and orientation | — | ✅ |
| Histogram, clipping and focus peaking | — | ✅ |
Re-extract image is gated with the full decode, because its whole purpose is rebuilding the full-fidelity render.
How the app tells you a control is Pro
Pro controls are badged, not disabled — a small star appears on the High-Fidelity button, the re-extract button, the histogram/clipping/grid/level chips, the share and export icons, and beside the Compare (N) label. A disabled icon would be indistinguishable from one greyed out because nothing is selected.
Tapping one takes you straight to the RawTriage Pro screen with that capability named in the headline, e.g. "Side-by-side compare is a Pro feature". There is no dialog and no interstitial — just the offer, which you can dismiss with Back.
The subscription
- One auto-renewing Google Play subscription, product id
pro_subscription. - It opens with a 14-day free trial, granted once per Google account. Clearing app data or reinstalling does not restart it — the trial lives in Play's ledger, not on your phone.
- The price is whatever Google Play shows you, in your currency. The app never invents a number: if it cannot reach the store it says "Price and renewal shown on the Google Play checkout" rather than guessing.
- After the trial it renews automatically until you cancel. Cancel any time before the trial ends and you pay nothing, and you keep Pro until the trial expires.
- Cancel in Google Play — the paywall's Manage or cancel subscription link takes you to the right page. Cancelling stops the next charge; it does not shorten a period you have already paid for, and refunds are handled by Google Play.
- Restore purchase is always available, and it is also how a subscription bought on another device is picked up. The app re-checks Play on every launch and every resume.
- If your payment fails and Play puts the subscription on hold, the app says so plainly ("Your subscription is on hold. Update your payment method in Google Play to restore Pro.") rather than silently dropping you to free.
- There is no account and no server. Nothing to sign up for, nothing to log into, nothing of ours holding your subscription.
If you already have Pro, the screen shows "Pro is active on this device." or, during the trial, "Free trial active. First charge on 3 October 2026." so you always know when the first charge lands. This is an in-app reminder only — the app deliberately does not ask for notification permission.
17. Privacy: what does and does not leave your phone
The app declares exactly two Android permissions, and neither is a storage permission:
| Permission | Why |
|---|---|
com.android.vending.BILLING | Lets the app reach the Play Store to start, renew and restore the Pro subscription |
android.permission.INTERNET | Required by Google's Play Billing library to verify a purchase. Nothing else in the app opens a connection. |
No storage permission. Every folder is reached through a Storage Access Framework grant that you gave, that covers only that folder, and that you can revoke at any time. The app never enumerates your media library.
What stays on your device:
- Your photographs — they are decoded locally, and no image data is ever uploaded anywhere.
- Your culling decisions: a local record in app-private storage, plus the XMP sidecars written beside your files.
- Your crash reports. RawTriage uses no hosted crash-reporting service; reports are written to app-private storage and leave only if you explicitly share one (§18).
- Your subscription status — read from Google Play and stored locally. The app has no server of its own to send it to.
What leaves the device:
- Your subscription purchase and renewal, handled entirely by Google Play. RawTriage never sees your payment details, and Google's privacy policy governs that transaction.
- A web page, if you tap Help, Open privacy policy, or a GPS coordinate. Those are handed to your browser or map app, which are separate applications with their own privacy practices — the app does not fetch or render them itself.
There is no analytics, no advertising, no tracking SDK and no account.
Two places state this inside the app: the Licences screen (i) carries the privacy policy link and the address in full, and the Diagnostics screen carries a plain-language disclosure of what a report contains. Note that the current build's Licences screen renders less text than older builds did — the summary paragraphs are currently not displayed. The policy itself, at https://www.easthillsmedia.com/info/privacy-policy/rawtriage/, is the authoritative statement, and the Licences screen has a Copy link button if you have no browser.
18. When something goes wrong: diagnostics
The bug icon on the folder screen opens Diagnostics. It exists so you can hand evidence to whoever supports you without a cable and a developer machine — and so you can answer "what did the app try, and what did the library say?" yourself.
What is on the screen
| Section | What it tells you |
|---|---|
| Intro | That nothing here leaves your device unless you share it |
| What a report contains | The disclosure, placed above the Share buttons: app version, Android version, device model, CPU architectures, the stack trace, and the last 40 steps the app took — and that those steps name your files, e.g. full decode: IMG_1234.CR3, so a report can reveal your folder and file names. Your photos are never included. |
| Memory budget | The heap Android granted the app and the cache windows sized from it. Fills in once you have opened a folder. |
| RawTriage Pro | Which tier this device resolved (Free tier / Free trial with the first-charge date / Subscribed) |
| Crash reports | Up to 10 reports, newest first, each readable in place and shareable |
| Last decode error | Which file failed to decode, which path was tried, when, and why |
| Recent activity | The last 40 recorded steps, oldest first — the lines that turn a bare crash into an answer to whether it failed while importing or while exporting |
| Decoder trace | A tool that re-runs every available extraction path against one file |
Sharing a crash report
Tap View to read a report in place, or Share to hand it to any app on your phone through the system share sheet. The report is copied into a cache directory first, so the share hands over a copy rather than exposing the app's private storage.
A report is a snapshot: one report, replaced each time, not an accumulating collection.
You can also read reports over adb, if you are that kind of photographer:
adb shell run-as com.easthillsmedia.rawtriage ls files/crashes
adb shell run-as com.easthillsmedia.rawtriage cat files/crashes/crash-20260916-231900.txt
The decoder trace
If one particular file will not open, this is the tool. Type a filename or a fragment of a path into File name or path fragment, tap Run decoder trace, and the app runs every extraction stage against that file natively and prints what each returned — which format was identified, which path succeeded or failed, and the orientation it found.
Notes:
- The trace needs a file from a folder you have already loaded, so open the folder first. With an empty search box it takes the first loaded image.
- It re-runs the real decode ladder, including the fallback to a staged cache copy, so it reproduces what the app actually does rather than what it should do.
- The trace is available on the free tier.
Troubleshooting
| Symptom | What is actually happening | What to do |
|---|---|---|
| A frame looks like blocky streaks at high zoom | You are looking at a magnified embedded preview because the full decode failed, or has not landed | Tap High-Fidelity; if that fails, tap Re-extract image |
Full decode failed — tap Regenerate | The full decode failed for this frame | Tap the refresh arrow (that is what "Regenerate" refers to) |
Could not extract preview | Even the embedded preview could not be read | Tap the refresh arrow; if it persists, run a decoder trace on the file |
| The same frame is wrong after a relaunch | A cached decode or staged copy is damaged | Tap Re-extract image — it purges that frame's cache and rebuilds from the original |
| A photo appears twice | A RAW+JPEG pair is not collapsed | ⋮ → Collapse burst stacks |
| A burst shows as several frames | Stack collapsing is off | ⋮ → Collapse burst stacks |
| A folder I added never appears | It has no RAW files in it (JPEG-only folders are not listed), or it was already added | Check the folder really contains RAWs |
| A folder I had disappears after unplugging a drive | The volume is unmounted; the app keeps the URI and shows the folder only while it is readable | Re-attach the drive; the folder returns |
Import says Nothing to import | The source really does hold nothing the importer copies (no RAW, JPEG or XMP files) | Check the folder you picked as the source — and note that a failure to start now says Import failed: … instead |
Import says Import failed: <reason> | The run never began, and the reason is named | Act on the reason: choose a writable destination, re-attach the card, or pick non-overlapping folders |
| I dismissed the import result before reading it | The summary is a snackbar, and it can be missed | Open the destination folder and check the file count |
| The file count on a folder card looks stale after an import | The folder list is not re-scanned after an import | Restart the app, or add/remove a folder |
| Rejected files came back after I deleted them | The app was killed during the undo window, so the deletion never committed | They are still marked rejected; delete them again |
| I deleted something and changed my mind | You have a short window, and it ends early if you leave the screen | Tap Undo in the snackbar — do not navigate away first |
| A frame is sideways or upside down | The camera wrote incorrect orientation metadata | Not currently fixable in-app; see §21. Report it, since the app derives orientation from LibRaw's own reading |
No subscription found on this Google account after a reinstall | Play has no active subscription on that account | Sign in with the Google account that bought it and try Restore purchase again |
| Every Pro control is badged and taps lead to the paywall | You are on the free tier | See §16 |
19. Workflows that work well
Wedding or event: 3,000 frames to 300
- Offload the cards with Import, verification on (§12).
- Add the destination folder. Leave stacks collapsed so bursts count once.
- Filter to Unrated. Turn auto-advance on. Work the grid: double-tap keepers, long-press duds. Do not rate.
- When the progress strip reads
3000 / 3000 reviewed, switch to the Rejected chip and delete them — with the XMP checkbox left unchecked, so nothing a second shooter's editor wrote is destroyed. - Filter to the survivors and do a star pass: 5 for the album, 4 for the couple's selects, 3 for spares.
- Hand the folder to the desktop. Your stars and flags arrive with the sidecars (§15).
Client selects
- Import or add the shoot.
- Reject the obvious mistakes, then rate the rest 1–5 by how strong the frame is.
- Filter to ★★★★ 4+ and use Export selected to folder at 2048 px into a
selectsfolder. - Share that folder however your client prefers. The star rating travels in the JPEG's EXIF; the internal reject decisions do not.
Picking one frame from a burst
- ⋮ → Expand burst stacks to see every frame.
- Select two to four candidates and tap Compare (N).
- Turn Sync ON, pinch into the face or the hands — every pane follows to the same subject point.
- Tap the pane you prefer to make it active, then give it 5 stars (which also keeps it).
- Reject the rest from the same screen, or go back and use the bulk toolbar.
- ⋮ → Collapse burst stacks and filter to ★★★★★ 5 to confirm you have one winner per burst.
Judging exposure without a desktop
- Open the frame and switch to High-Fidelity.
- Turn on Clipping and look for red (blown highlights) and blue (crushed shadows) — the overlay shows where, not just whether.
- Turn Clipping off and turn Histogram on to check the shape of the tonal range and the two clipping percentages.
- Turn on Peaking to confirm the plane of focus landed where you aimed.
- Grid and Level to check the composition and the horizon, then rate the frame and move on.
Reviewing a folder someone else culled
- Add the folder. If sidecars exist, their ratings and flags seed the grid automatically.
- Use the capture facets to isolate, say, one camera body or one lens — useful when a second shooter's frames interleave with yours.
- Use Search filename for a card or sequence prefix.
20. Reference: gestures, formats, limits
Gestures
| Screen | Gesture | Action |
|---|---|---|
| Folder list | Tap a card | Open the folder |
| Folder list | Long-press a card, or tap its bin | Remove the folder (files are kept) |
| Gallery | Tap | Open the frame |
| Gallery | Double-tap | Mark kept |
| Gallery | Long-press | Mark rejected |
| Viewer | Swipe left / right (at fit size) | Previous / next frame |
| Viewer | Pinch | Zoom (fit → 8×+) |
| Viewer | Drag (zoomed) | Pan |
| Viewer | Double-tap | Toggle fit ↔ 1:1, anchored on the tapped point |
| Viewer | Swipe up (≥ 72 dp) | Mark kept |
| Viewer | Swipe down (≥ 72 dp) | Mark rejected |
| Compare | Tap a pane | Make it the active pane |
Supported file types
RAW: CR2, CR3, NEF, ARW, DNG, ORF, RW2, PEF, SRW, RAF Also handled: JPG/JPEG (folded into a RAW of the same name, or listed on their own), XMP sidecars (never listed as images)
Limits and defaults worth remembering
| Thing | Value |
|---|---|
| Minimum Android version | 8.0 (API 26) |
| Frames in one comparison | 2–4 |
| Viewer zoom | fit up to at least 8× fit |
| Delete undo window | about 10–12 seconds, and it ends early if you leave the gallery |
| Burst grouping | names differing by a trailing number advancing by 1–2, within 10 seconds |
| Stack collapsing | on by default |
| Auto-advance | off by default |
| Export size default | 2048 px, remembered for the session |
| Export format | JPEG, quality 92 |
| Verification | SHA-256 read-back, on by default for imports |
| Crash reports kept | 10, in app-private storage |
| Activity ring | the last 40 steps |
| Locales | English and German |
21. Known limitations and rough edges
Being straight with you about what this version does not do, so you do not discover it mid-shoot.
The full decode is capped at 8 megapixels. On a 24 MP body your High-Fidelity render is roughly 6 MP; on a 60 MP body, roughly 3.8 MP. The UI says so explicitly, but it means critical focus at the pixel level cannot be confirmed on the phone. Treat High-Fidelity as "enough to judge exposure, colour and where focus roughly fell".
Nothing remembers where you were. The last folder, the grid scroll position, and the zoom/pan in the viewer are all lost when you leave. Worse, returning to the gallery from an image re-runs the folder load, which resets the rating filter to All, clears the search and any capture facets, and clears the undo history. Only the sort order and the two persisted toggles (auto-advance, stack collapsing) carry over.
There is no rotation control. If a camera writes wrong orientation metadata, the app shows what the metadata says and offers no way to correct it on the phone.
Deleting commits sooner than the dialog implies. The dialog says "a few seconds to undo". In practice the window ends after about ten seconds, or immediately when you leave the gallery screen. Tap Undo, do not navigate.
Export does not suffix name collisions. Import writes IMG_1234 (2).ARW; export reports IMG_1234.jpg already exists as a failure. Exporting twice into the same folder produces a wall of failures rather than new files.
Folder counts go stale after an import, and a folder with no RAW files is silently ignored when you add it.
The rating filter chip order is confusing — the ascending thresholds sit after the absolute five-star chip.
On the free tier, XMP sidecar writing fails silently. Your culling persists in the app, but no .xmp file appears, and nothing tells you why.
Compare has no Undo prompt and no export button, and its Keep/Reject controls are one-way.
No haptics, no first-run explainer, and the folder empty-state text names only four of the ten supported RAW formats.
The Licences screen currently displays less than it is written to display — the privacy summary, the billing disclosure and the "nothing on this screen is fetched over the network" note are commented out in the current build. Use the policy link for the authoritative statement.
A fuller engineering assessment, including the reasoning behind some of these choices and which are being worked on, is in the project review.
22. FAQ
Does it need a network connection? Only to start, restore or manage the Pro subscription through Google Play. Everything else — scanning, decoding, culling, XMP, import and export — runs entirely offline.
Will it eat my battery or my data? No network use beyond billing, so no data. Decoding RAW is CPU-heavy, which is why High-Fidelity is a deliberate, cached action rather than the default view.
Does it work with a card reader or a USB drive? Yes. Anything the Android system picker can show you — internal storage, SD card, USB OTG, and most cloud providers' document providers — can be added as a folder and imported from.
Do my ratings survive if I move the folder? The in-app record is keyed to the file's location, so moving files loses the app's own record. The XMP sidecars travel with the files, though, and the app reads them back — so on the Pro tier, moving a folder preserves everything as long as the sidecars move with it.
Will it damage my files? Import takes a read-only grant on the source, so it cannot modify what it copies from. Export writes new JPEGs and never overwrites existing files. Delete is the only destructive action, and it is the one protected by a confirmation, a checkbox and an undo window.
Can I use it as my only RAW viewer? For culling, yes. For critical inspection, no — see the 8 MP cap in §21. It is designed to be the step before your desktop, not a replacement for it.
What happens to my culling if I uninstall? The in-app record is deleted with the app. The XMP sidecars are not — they live beside your photographs and survive everything. On the free tier, where no sidecars are written, uninstalling loses your ratings.
Why does the app ask me to pick a folder instead of just showing my photos? Because that is what lets it hold no storage permission at all. Android's folder grant covers exactly what you chose and nothing else, and you can revoke it whenever you like. It is one extra step in exchange for an app that cannot browse your phone.
Can I cull the same folder on two devices? Yes, with caveats. The XMP sidecars are the shared state, so both devices will see each other's decisions when they scan the folder. The in-app local record is per device and takes precedence once it exists, so a device that has already scanned a folder will not pick up a later external change to a frame it already knows about.
Is there a desktop version? No. RawTriage is the phone-sized first pass; the sidecars are how it talks to whatever you use at the desk.
RawTriage 2.0.1 — RAW Photo Culling. Built by Easthills Media Inc. LibRaw is used under CDDL-1.0; the full licence text and every other attribution are in the app under Licences (the ⓘ icon on the folder screen).